As an Adobe Certified Trainer for Premiere Pro and After Effects, I have to know the programs’ default settings, shortcuts, and behaviors to a T. So much so, that I rarely personally tweak and customize anything within the apps. Luckily, the defaults work well for a majority of users, but for the rest of you tinkerers out there, Adobe does a fantastic job making most of their apps incredibly flexible to look and act the way you want them to. In this post, I wanted to tackle many (but not all) of the ways you can tweak Premiere, ranging from some of the more obvious (Sequence presets) to some of the more obscure (Source Panel presets).
Sequence Presets
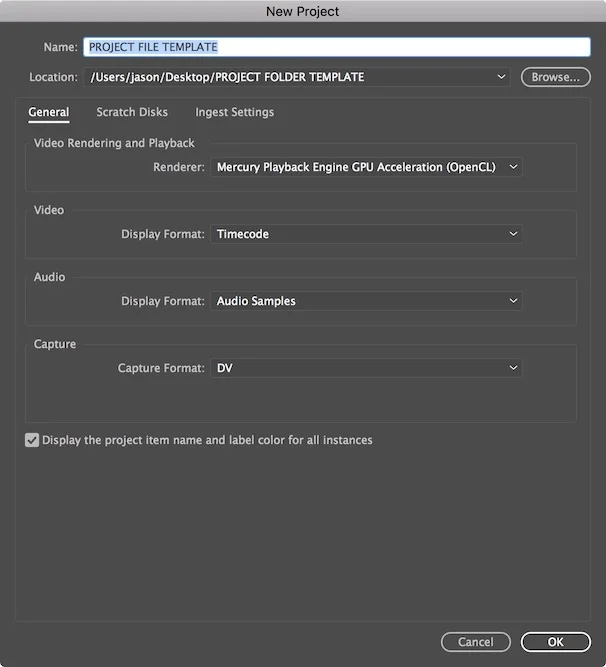
The New Sequence window in Premiere isn’t great, especially if you’re a newer user. It gives the wrong impression that Premiere gives a crap about what format or codecs you’re using when in reality all it really essentially cares about is resolution and frame rate. So, we use the New Sequence from Clip command and all is well. But what if you work a full-time gig where you are constantly tweaking your timeline properties the same way every time after creating it. Tired of always going to the Add Tracks window to get eight audio tracks, six video tracks and then naming each one?
Go to File-> New-> Sequence. Select the Sequence Preset that you think is closest to matching your source footage. Don’t worry if it’s not exact! Go to the Settings tabs and tweak anything that doesn't match the majority of your footage. The Video Previews section is not essential to tweak here and frankly, deserves an entire post unto itself (hey, that’s a good idea…). But for this post, we can leave it alone.
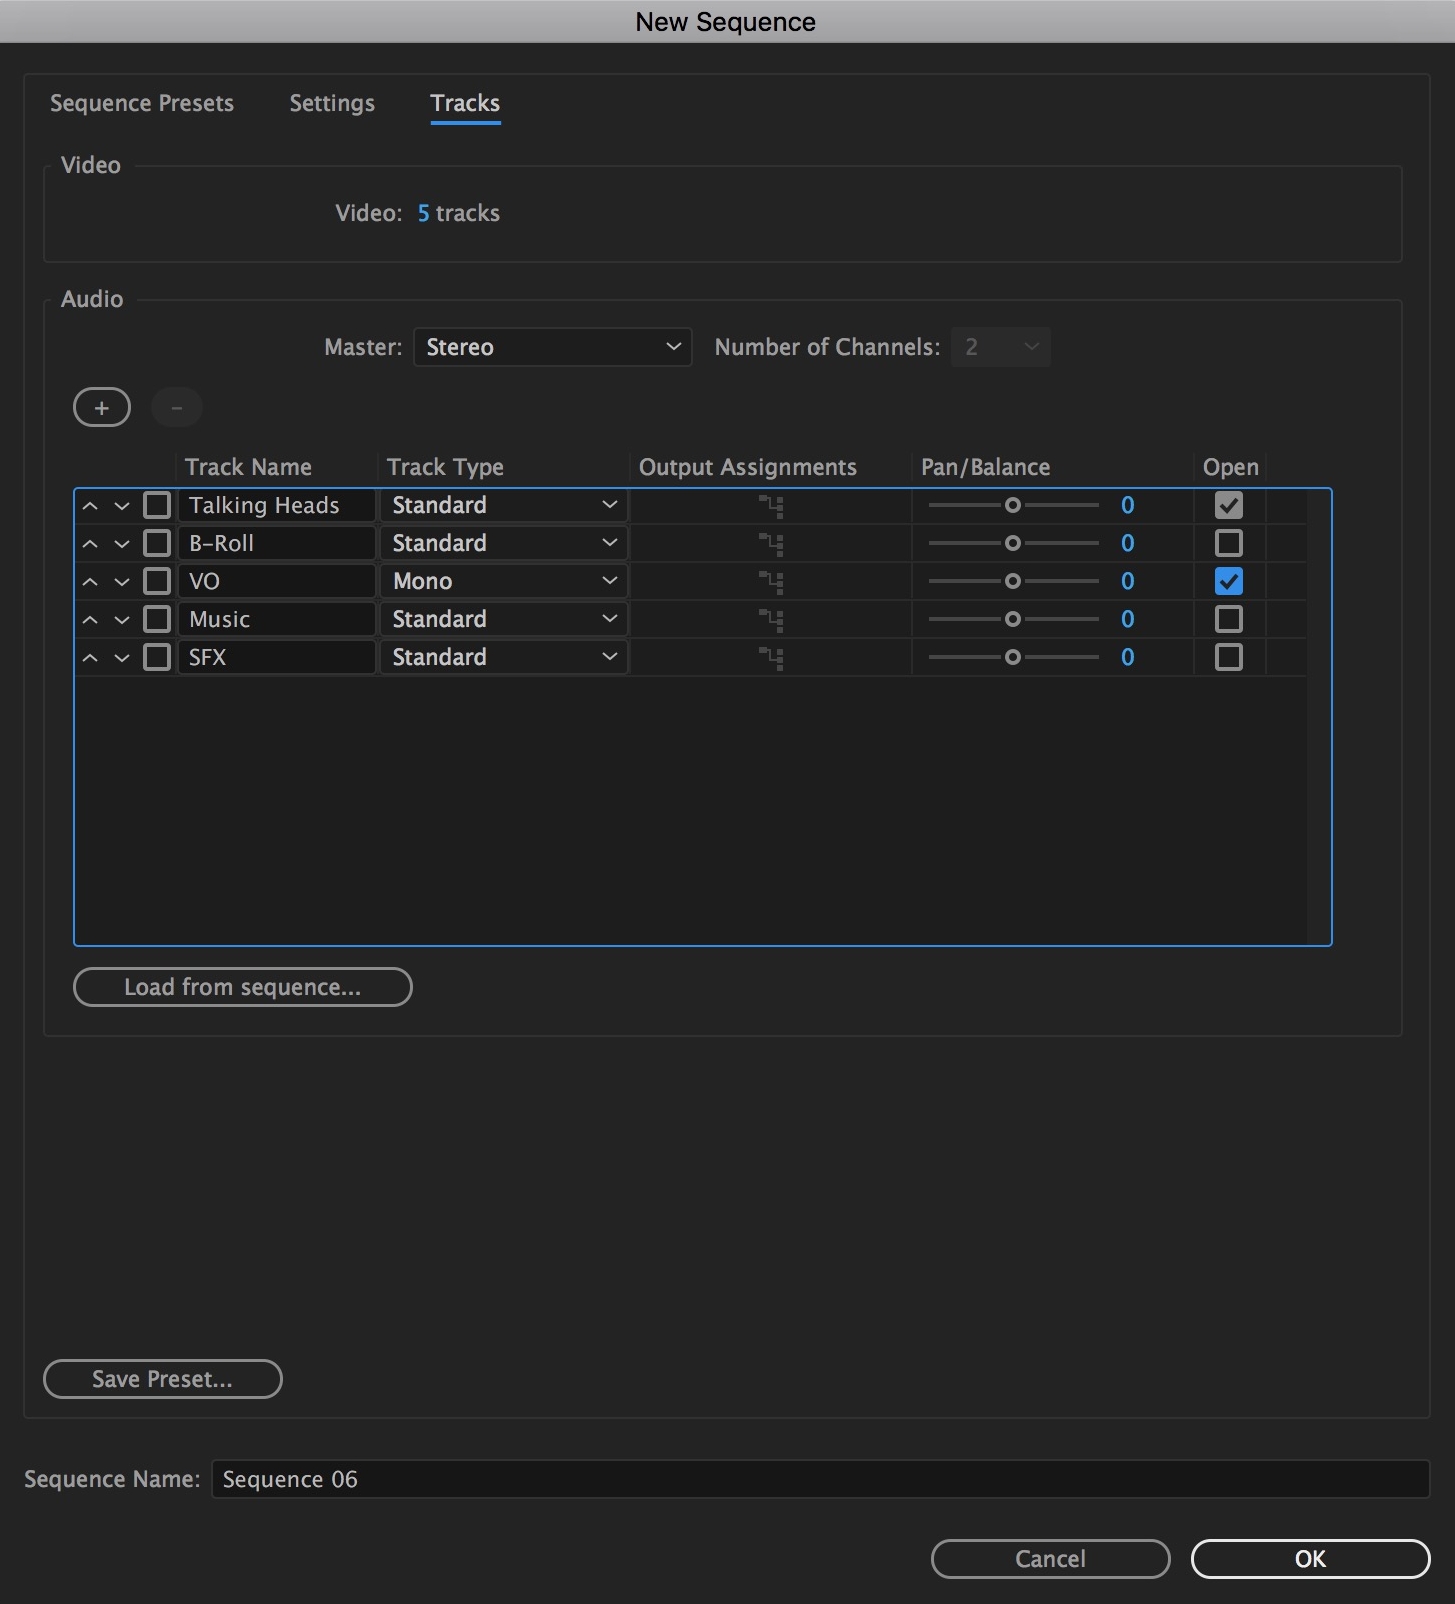
Lastly, go to the Tracks tab. Here’s the big one. Add however many and whatever kind of tracks you often have in a project. Name them, set the Track Type, etc. And if you’re wondering what the “Open” check mark box does, don’t get excited. It’s simply a setting to determine if the track opens expanded or minimized in height (more on that next!). Finally, hit that little Save Preset button in the bottom left! From now on, you will have your own preset sequence setting in the New Sequence window.
Track Height Presets
Unless you’re on a very large, high resolution monitor, Premiere’s Timeline panel can get a bit… squished. It’s easy to resize a track’s height by grabbing the divider between two tracks and dragging, or scrolling over the track header but if you find yourself doing it a lot, it can get tedious. Instead, save some presets! This is especially handy for audio. Do you sometimes like to shrinks all your audio tracks as tiny as possible and make your talking head audio track gigantic for keyframing? Adjust your timeline as such, click on the Timeline Display Settings button (the wrench icon), and select “Save Preset…”
In the window that pops up, you can not only name the preset, but you can assign a keyboard shortcut to it… sort of. Let’s say you select “Track Height Preset 1” from the Keyboard Shortcuts dropdown menu… well, what’s the shortcut? You have to make it. Which segues nicely into…

Keyboard Shortcuts
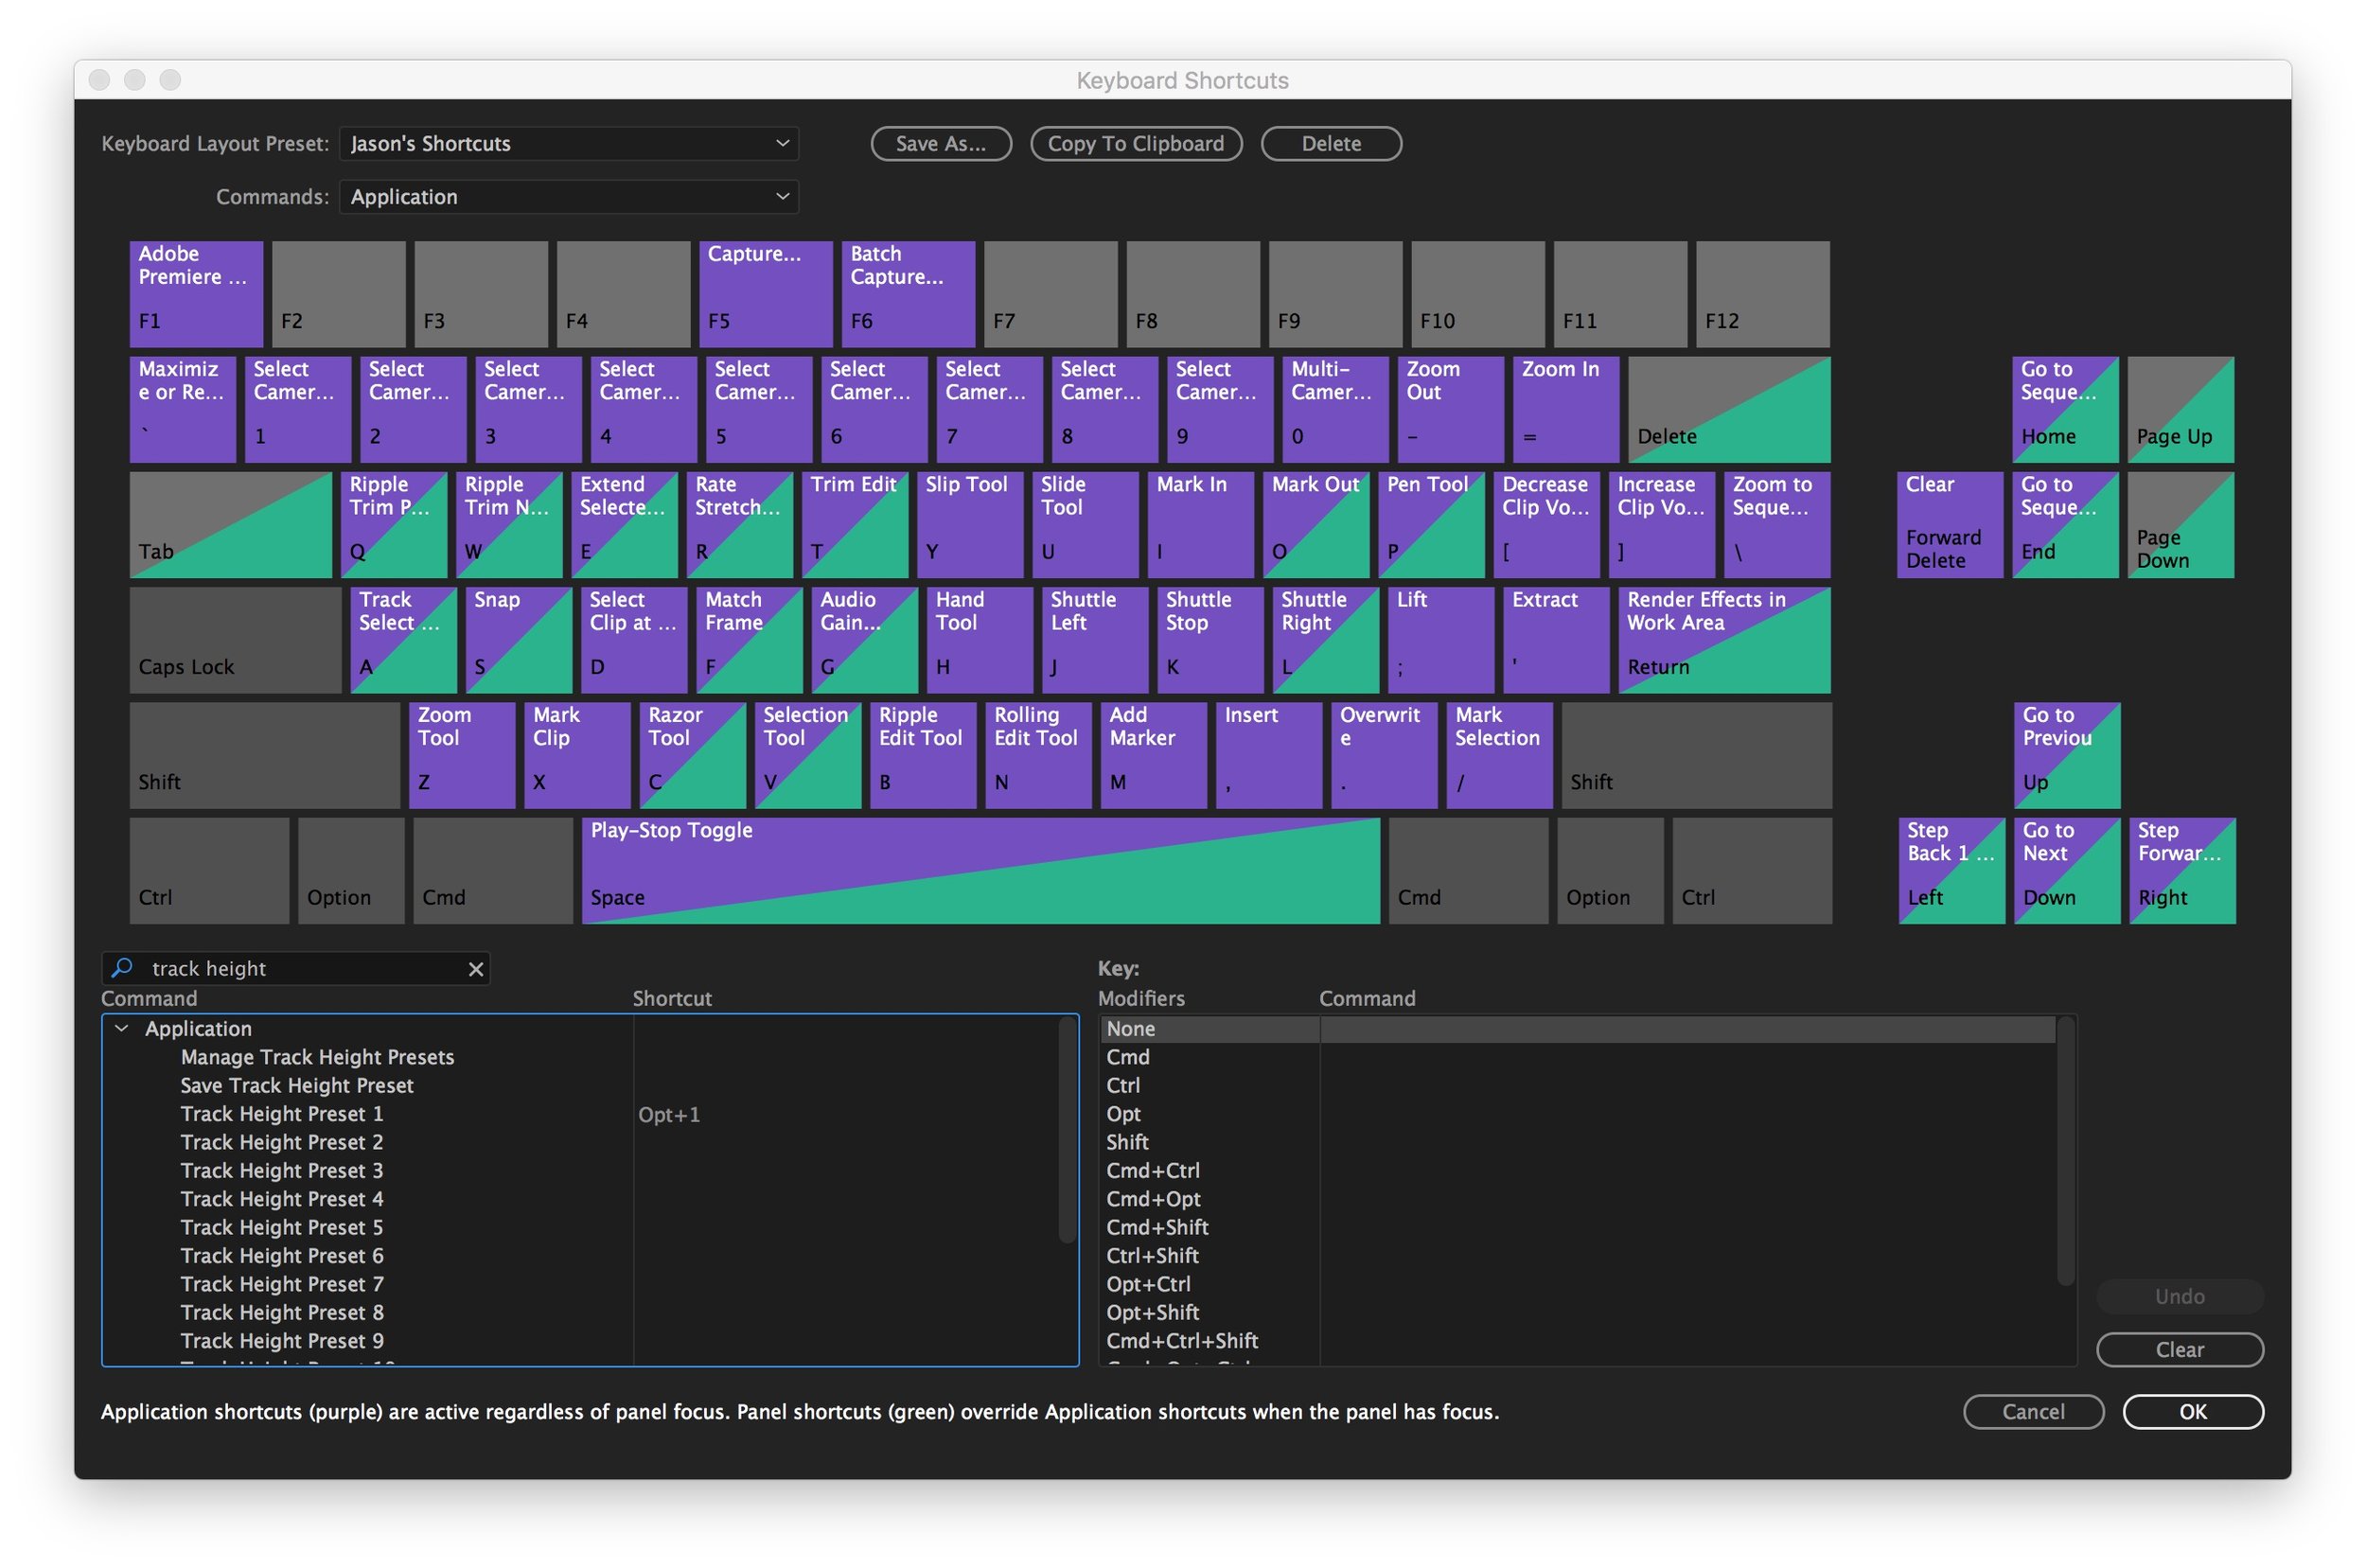
This one is easy. On a Mac, go to Premiere Pro CC-> Keyboard Shortcuts and on Windows, go to Edit-> Keyboard Shortcuts. This window was heavily revamped in the CC 2017 release and now shows a virtual keyboard layout. Use the search box on the left side below the keyboard and search for “track height.” Double click in the shortcut column next to Track Height Preset 1 and type in your desired shortcut (Option/Alt+1 perhaps). If you pick something already in use, Premiere will let you know and give you the opportunity to easily undo.
Note that at the top of the screen “Keyboard Layout Preset” now says “Custom.” You can select Save As and name your new layout, which is a copy of the default shortcuts plus your new one.
As a note of caution, if you’re a recent convert to Premiere, avoid the temptation of selecting one of the Media Composer or Final Cut shortcut presets. Learn Premiere’s default shortcuts. There is nothing wrong with adding your own shortcuts for the many commands that don’t initially have one, but if you are ever in a collaborative environment and sharing a system with others, it’s nice to keep things default, making life much easier if you hop machines.

Source Panel Presets
Back to the timeline. If you love rough cutting with the keyboard (see my post on it here), one limitation is when you suddenly need to add b-roll to V2 or perhaps music to A3. This is because of the Source Panel arrangement. You’ve got to click around and highlight the correct panels. Again, if you find this to be a repetitive workflow, create an arrangement of the source panels that you like, right click on the panel, and select Save Preset. Name it, and just like with Track Heights, you can select a keyboard shortcut setting (which again you’ll have to create on your own). If you want to skip the keyboard shortcut process, you can select your preset at any time by right clicking again on a source panel button.
After covering some of those biggies in-depth, here’s a quick hit list of just some of the other things you can customize in Premiere:
Workspaces
You can grab any panel by its name and drag it around the screen to place it elsewhere. Look for giant purple rectangles before letting go to add a panel to another batch of panels or look for a purple trapezoid to place the panel in its own space. And then, of course, you can save your creation by going to Window-> Workspaces-> Save As New Workspace.
Export Presets
Tired of having to tinker with a ton of video codec settings every time you export? In Export Settings, customize your settings once in the video tab and then look back at the top of the window for the Preset dropdown to save it as preset. You can even optionally include settings from the Effects and Publish tabs! For bonus points, you can even create custom metadata selections for exporting only certain metadata with your export. Check out the Metadata button for more.
Overlays
Premiere can display all sorts of information right in the Program Monitor as you edit (source timecode, marker names and comments, file/source name, etc.). This can be turned on by clicking on the Settings button in the Program Monitor and selecting Overlays. But also notice that there is an Overlay Settings window you can access in the same place to customize exactly what you see and where. And (in case you haven't figured out the theme of the article yet), you can save them as presets!
Metadata Display
The List View in the Project Panel is great for seeing a ton of useful info about your media at once. But there are so many other useful columns that don't show by default. Right click on a column header to access the “Metadata Display” window to hide and show what you (don’t) want to see. Check out my blog post on this in-depth here.
Title Presets
One of Premiere’s few achilles’ heels is its titling ability. While I’ll put off that tirade for another day, if you design something (perhaps a lower third) that you want to reuse in future projects, how to save it isn’t immediately obvious. After designing a title in the Title Panel, click on the little icon that looks like three stacks of paper with a letter T on top. This brings you to yet another panel where you must click another panel menu button in the upper right and select “Import Current Title as Template” (which, by the way, is the least obvious menu command name ever).


Effect Presets
Have you created the greatest effect of all time, combining Emboss, Posterize, Solarize, and Spherize, all with custom properties? (Note: don’t ever that do). But if you did and didn’t want to redo it over and over, select all the effects in the Effect Controls panel by clicking the name of the effect and Control/Command clicking the rest and then select “Save Preset” from the panel menu. If keyframes were involved, select “Scale” to scale the animation relative to the length of the clip, and select Anchor to In/Out Point if you want to lock in the timing (most useful with a manually generated transition).