Premiere Pro comes with a robust set of tools to make your editing life easier. As an instructor, I usually see editors both new and old do certain tasks over and over again.
The only problem with this is the majority of our projects were due yesterday. Here are some tips you can use to help automate tasks in Premiere Pro so you can meet those project deadlines.
1. Using Search Folders to Find Clips Faster
While you can create bins to organize your clips, you can also create search bins. Search bins are unique because they organize clips based on metadata or the data already stamped on your clip.
Let’s say you had a project with thousands of video clips from 3 different cameras; a GoPro, Canon c300 II, and a P2 camera. By default each camera records clips with a unique id code (ie: GoPro’s typically have the word GOPR at the front of the name). We could take this info and create a search bin that would only load our GoPro footage into it.
In the Project Panel, in the top left hand corner, click on the bin icon with the magnifying glass on it. In the example below I searched for clips by media type and name. After pressing OK, a search bin is created with only my GoPro clips inside.


2. Auto-title Generation Assistance With Photoshop
If you read my article on 10 tips in Premiere Pro a few weeks ago, you learned that you could automate titles to a sequence by using markers and the automate to sequence button.
What if you could also create hundreds of lower thirds with only a spreadsheet and just one lower third template? Photoshop allows you to export a file as a series of data sets. For instance, I can create a Photoshop lower third with some filler information such as name, occupation and company logo (Yes, you can even swap out graphics ☺).
I then create a spreadsheet with 3 columns and list all the information for each person (note: the 3 columns names must match the names of the Photoshop layers case by case).
From here, we simply connect the spreadsheet to the Photoshop layers by applying a data set and defining variables. You can read more about this workflow on a fantastic Premiere Pro site called PremierePro.net. The sites creator Jarle Leirpoll even has a free spreadsheet and Photoshop file you can download to see the entire workflow.
3. Beat Edit
If you cut video trailers or slideshows to music frequently then this next plugin is a must to consider. Beat Edit is a tool that analyzes music and detects beats automatically. The best part is you can fine tune which beats are highlighted.
Let’s say I want a marker every 8 beats. I can reanalyze the audio in the Beat Edit window and the new beats will be identified. Once I’m satisfied with the beats I’ve created, I can export a series of sequence markers to the timeline so that I can automate clips into the sequence at the markers location and based on my selection order.
4. Using Keyboard Shortcuts to Drive Track Height Presets
So how long do you spend changing the height of your tracks in Premiere Pro? Do you scroll with your mouse and expand or minimize the height of your tracks constantly depending on if you’re working on video or audio or both.
If you are, there’s an easier way. If we take a few minutes, we can set our favorite Track Height Layouts and save them as presets that we can trigger with keyboard shortcuts.
In the below example, I’ve set my V1 and v2 tracks as large. Under the timeline settings menu, I choose save presets. In the save preset dialogue box, I’ll name it V1 and V2 large and assign it to the keyboard shortcut Track Height Preset 1.


By default, track height preset shortcuts are not assigned. To do so, go to Keyboard Shortcuts under the Premiere Pro (Mac) or Edit Menu (PC) and assign it to a shortcut of your choice. You can see how to do this in the following video I did below.
https://helpx.adobe.com/premiere-pro/how-to/premiere-pro-keyboard-shortcuts-cc.html
5. Creating Watch Folders for Export in Adobe Media Encoder
If you go to Adobe Media Encoder often and apply the same or multiple system presets to sequences often, you may want to consider watch folders.
Watch folders are meant to help you automate the exporting process. If you have Media Encoder open in the background and have a watch folder assigned, it waits until media is dropped inside and will then compress your video to the settings specified.
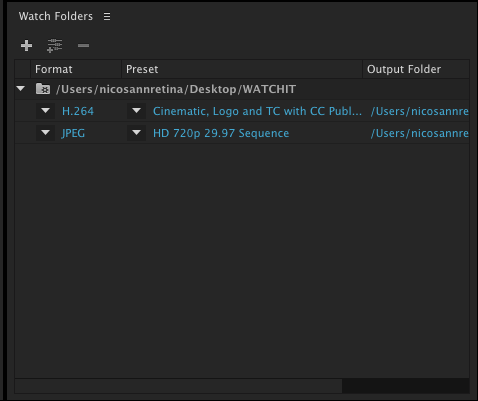
You can setup watch folders in the bottom right of the Media Encoder interface. So instead of applying settings to a sequence you’ve sent over from Premiere, you’re simply applying those settings to a folder on your system.
In the below example, I have a folder called watchit on my desktop with 2 settings on it. Let’s say I export a master file out of Premiere to the root of that folder, media encoder will then do the rest and compress 2 additional files.
It will even upload it to the web if you tweak the appropriate settings of the preset. This is something I’ll explore in more detail with you in an upcoming article.